Customise NetScaler Gateway user interface on a per vServer basis
The following guide provides details on how to create customised logon page on the same NetScaler for different NetScaler Gateway virtual servers.
Citrix currently do not provide the ability to create separate NetScaler Gateway themes on a per NetScaler Gateway virtual server basis. If a theme is applied to the NetScaler it is applied at a global level, affecting all virtual gateway servers. There is also no native method for providing separate images and logos for different NetScaler Gateways.
Service providers using NetScalers to host multiple NetScaler Gateways for different companies require the ability to customise the logon page on a per virtual server basis. This includes changing logos and the text displayed on the portal page.
The following procedure will show you how to change the logo used on the logon page for a particular NetScaler Gateway virtual server based on the requesting URL used.
Procedure
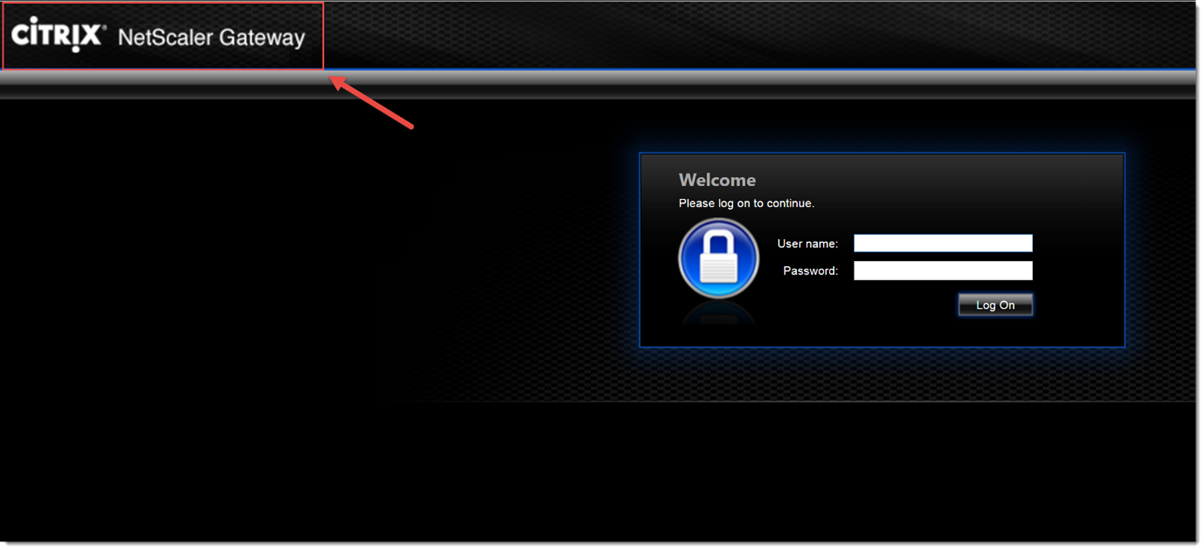
When landing on the NetScaler Gateway logon page, users are directed to the following URL: https://example.com/vpn/index.html
This index.html file exists in the following directory on the NetScaler: /netscaler/ns_gui/vpn/index.html
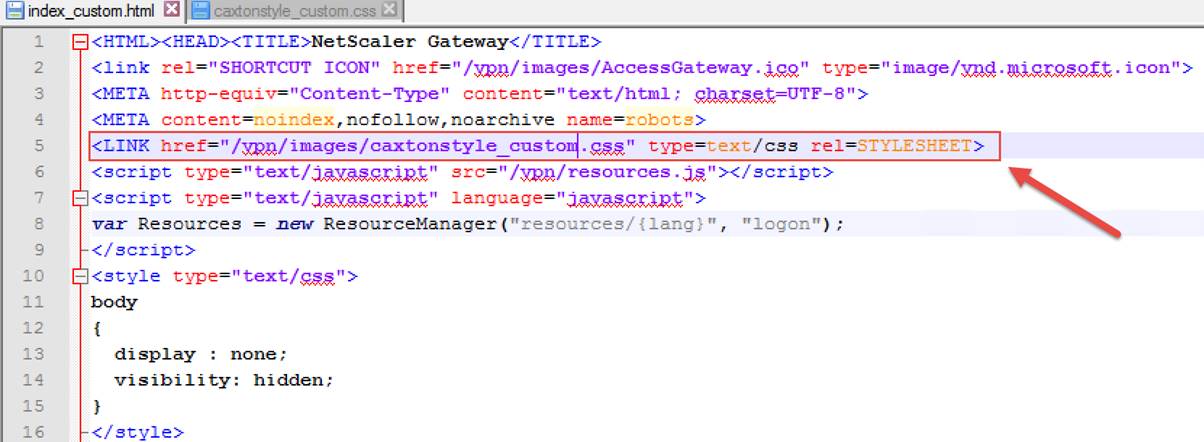
The index.html file by default references /netscaler/ns_gui/vpn/images/caxtonstyle.css which provides the style sheet giving the logon page the look and feel. It also specifies the logos and images used.
Scenario; You require a different logo displayed to users who access a different NetScaler Gateway virtual server on the same NetScaler using a different URL (e.g. https://companyname.com).
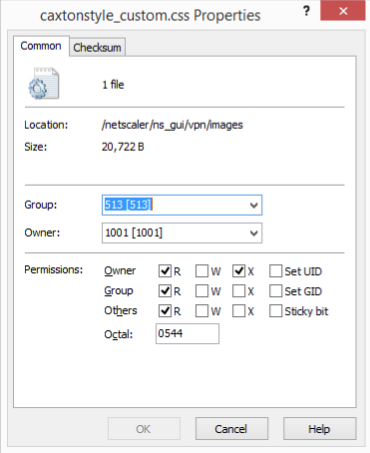
This can be achieved by copying the index.html file and renaming to index_companyname.html and copying the caxtonstyle.css to caxtonstyle_companyname.html. Copy the files and leave them in their original directories. Ensure once copied, update the permissions and owner of the files as per their originals.
Modify the index.companyname.html file to reference the caxtonstyle_companyname.html as shown below:
To update the following logo for a given customer, update the caxtonstyle_companyname.html file as shown below:
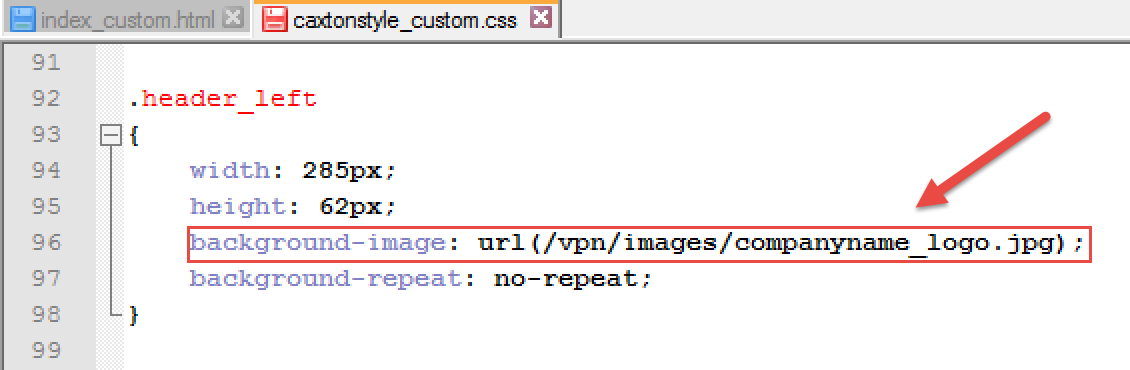
Copy the company logo into /netscaler/ns_gui/vpn/images/ using WinSCP.
To apply this new logon page, associated style sheet and image to a particular Gateway virtual server we will use a responder policy. This responder policy will detect when a particular URL is entered and redirect the user to the new logon page.
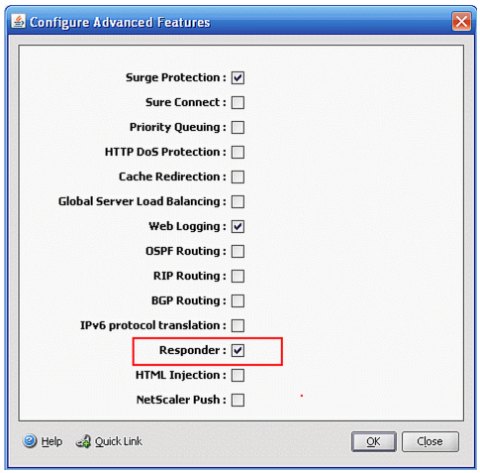
To ensure the Responder feature is enabled, From the GUI, navigate toSystem >Settings. InModes and Features, selectConfigure Advancedfeatures (ensure that you select the Responder feature), clickOK, and then click Close.
The following commands create the responder action and policy required:
add responder policy res_custom_companyname_nsgw_logon_pol “HTTP.REQ.HOSTNAME.EQ(\”companyname.com\”) && HTTP.REQ.URL.CONTAINS(\”index.html\”)” res_custom_companyname_nsgw_logon_act
add responder action res_custom_companyname_nsgw_logon_act redirect “\”https://companyname.com/vpn/index_companyname.html\””
Then bind this responder policy to the NetScaler Gateway virtual server requiring the customisations.
bind vpn vserver gw_vsvr_companyname.com-443 -policy res_custom_companyname_nsgw_logon_pol -priority 100 -gotoPriorityExpression END -type REQUEST
Now test and ensure the desired new functionality is working for the NetScaler Gateway.
The NetScaler /netscaler/ns_gui/vpn folder runs in memory and any changes to this directory are not written back to disk. Therefore to ensure the custom files are persistent on reboot, we need to save the files to the /var/ directory. A scheduled task will be created on system boot which will copy the files from the /var directory to /netscaler/ns_gui/vpn
Create the following folder /var/customisations/companyname/vpn/
Copy index_companyname.html into /var/customisations/companyname/vpn/
Copy companyname_logo.jpg and caxtonstyle_companyname.html into /var/customisations/companyname/images/
If the /flash/nsconfig/rc.netscaler file does not exist, create it:
cd /flash/nsconfig
touch rc.netscaler
Now edit the file and add the following copy commands to be initated on system reboot.
cp -rf /var/customisations/companyname/images/ /netscaler/ns_gui/vpn/images/
cp -rf /var/customisations/companyname/vpn/ /netscaler/ns_gui/vpn/
Restart the NetScaler and test to ensure your new customisations are persistent.
References
http://support.citrix.com/article/CTX126206
http://support.citrix.com/article/CTX123736
By Daniel Almond
Twitter: @AlmondDaniel
Daniel’s LinkedIn

Contact Deptive
Location
Deptive - Commercial Bay
11-19 Customs Street West St
Commercial Bay Tower, Level 17, Room 1715
Auckland 1010
Contact Details
0800 000 141
Postal Address
PO Box 34797,
Birkenhead, Auckland 0746